
Everyone should have 32 teeth in his mouth: 8 Incisors, 4 canines, 8 premolars, 12 molars. Sometimes one or more of these teeth is damaged, due to caries or other reasons, and needs to be covered with a crown.
In this case a dentist takes care of the damaged tooth. If the damage is deep, sometimes it is done a root canal treatment to remove the infected pulp of the tooth, and then the core of the tooth could be reinforced with a post.
- Root canal treatment
- Post
In other cases, the dentist removes only the damaged part.
- Removal of decay
In all cases, before to proceed to make the crown, the dentist will do a preparation of the tooth, shaping it to give room for the restoration, and takes an impression.
- Preparation of the tooth
- Impression
What happen then? How a dental crown is made?
There are several materials and techniques to make a dental crown, and the guy in charge of these procedures is the dental technician. The place where the crowns are made is called dental laboratory.
- Dental technician/dental laboratory
The first thing that a dental technician does when he receives an impression from a dentist is to pour it up with stone, to make a solid of the impression. There are several kinds of dental stone, with different properties.
- Impression
- Dental stones
- Pouring up
To pour up a dental impression are also used plastic bases, metal pins, and magnets that will help to section the single dies of the model without damage it. There are lots of these items available on the market, and each dental technician has his preferred system.
- Plastic bases
- Metal pins
- Magnets
When the stone has settled, the single dies involved in the restoration are separated from the model, to be able to work on it at 360 degrees. This stage is called preparation of the master model, and needs good handcraft skills.
- Single dies
When the model is ready it will be set up in an articulator. The articulator is an item that is designed to simulate the mouth movements. There are several kinds of dental articulators. Some of those are quite simple to use, others are extremely difficult and expensive. The experience of the dental technician will suggest him what is the best for your case. To set up the articulator properly it is used a special mounting stone and the registration of the bite of the patient provided from the dentist.
- Articulators
- Mounting
- Bite
When the model is ready it will possible to proceed with the crown fabrication.
The dental technician will individuate the preparation margin on the die. The preparation margin is the area of the tooth where the dentist would like the crown to link with the natural tooth underneath. It is very important to read properly on the die stone, because it is a key of the proper fitting of the crown and of his long-time success in the patient mouth.
- Die Stone
When the die is ready the dental technician will start with the design of the crown. The design could be made manually or digitally.
WAX AND CASTING TECHNIQUE (MANUAL PROCESSING)
The wax modelling was used for decades, and it is the traditional way in which dental crowns were (and sometimes still are) made.
It involves some special wax, handle or electric instruments, and lots of manual dexterity.
- Wax
- Carving instruments
- Electric waxer
- Electric dipping waxer
The modelled dental crown can be fabricated as solid or as reduced framework.
The solid crowns are the exact reproduction of the design (wax or digital) in a single material. In case of a traditional wax design the option are: a casted full metal crown or a pressed ceramic crown. The digital design can also be milled in wax and then casted or pressed, or can be milled directly in zirconia or other composite materials.
The procedure to cast a waxed crown involves a special cylinder, some investment material, an oven and a furnace.
The waxed item is inserted in a cylinder, that is then filled with liquid investment material. When the investment has hardening, the cylinder is inserted in an oven. The oven temperature reaches more that 800 degrees, melting all the wax. When the process is complete, the cylinder is ready for the casting. There are several kinds of casting machine, using different techniques. The main purpose for a casting machine is to melt the metal and to inject the liquid metal in the investment cylinder.
The metal could be a precious or not precious alloy.
- Casting machine
- Casted metal
DIGITAL WORKFLOW
The digital process involves a scanner and a software of CAD design. The model is scanned and then the design of the crown is made with a computer and a CAD Dental software.
- Scanner
- Digital design
When the design is complete, the file is sent to a CAM software. The operator will use the cam software to prepare the instructions for the milling machine.
- CAM software
- Milling machine
There are several milling machines available. The smallest and lighter can usually mill only soft materials, like wax or pre-sintered zirconia in a dry process. The biggest and heavier machines can also mill metal or other hard materials with a wet process.
A milling machine can be used to produce a full crown or a framework that will be layered with porcelain. In the modern dental technology, the milling processes are taking over the casting processes. With the milling the dental technician can have a better control on materials and can manage more reliable restoration. Of course, not everything can be milled, but we can safely say that a great part of dental restoration is nowadays produced through milling processes.
Another machine that can help the manufacturing of dental crowns is the 3D Printer. The wax used for casting, for example, can be designed in a Dental CAD and printed.
- Printed material
The printer can also be used to manage dental models and other appliances, like splint and surgical guides.
- Other printed materials
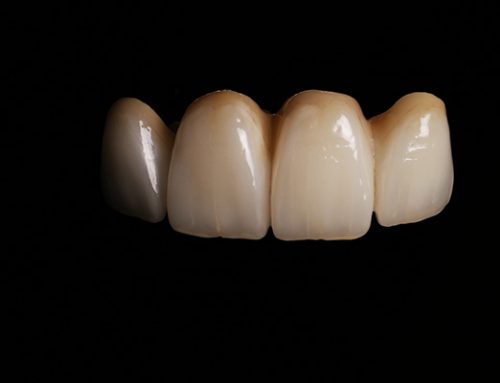
CERAMIC LAYERING
The final stage of the fabrication of a dental crown is the ceramic layering.
After the casting or the milling process the dental technician can have:
- A full crown, made in zirconia, lithium disilicate or other composite materials; (PHOTO A)
- A reduced framework of a crown, made in zirconia or metal. (PHOTO b)
In the first case the process to complete and customize the crowns involve some staining and glazing. The process in completed with a baking in the ceramic oven.
- Stain and glaze technique
- Ceramic oven
In the second case the process is more complex. The ceramic powder is mixed with some liquid, and the paste obtained is layered on the crown framework. Every layer has different composition and shades, to simulate a natural tooth, and needs to be baked and polished.
The layering process can last a few hours for a single crown, and several days for multiple crowns and high aesthetic works. In this process the skills of the ceramist and his manual dexterity can really make a difference, from a “bean crown” to the perfect emulation of a natural tooth. Sometimes the shade is not standard and needs to be customized after a trial. This often happen with anterior crowns that have a higher aesthetic demand.
- Bean crown
- Perfect crown